How to optimize browser caching

When users visit your pages, their browsers download all of the resources needed to display the page – the images, CSS, JavaScript and fonts, and so on. They all use bandwidth, and take time to transfer. But with the right configuration, you can tell those browsers that they can save and re-use those files. Then, they don’t need to re-download them on future page views and visits. That can make browsing your site feel a lot faster.
What is a browser cache?
When your web browser downloads resources from webpages, it saves them on your computer. When this happens, your website can also send additional instructions on how, when are where those resources can be re-used. Those instructions are sent in the form of HTTP headers; metadata which is sent alongside the resource.
The next time the browser encounters a request for that resource from a website, it can check if it already has a saved copy, and use that instead. Your browser manages this pool of resources, and keeps track of every object (and that object’s URL) in its cache.
You can test your browser cache on this page by simply reloading it. You’ll notice that it’s much faster than when you initially visited (or when you do a ‘hard refresh’), because your browser already has everything it needs to load the page saved ‘locally’, and ready to go.
Best practice for caching rules
Generally speaking, the best practice is to cache as much as possible, as often as possible, for as long as possible. As users browse your website, or visit repeatedly over a period of time, you want their experience to be as fast as possible. Not having to (re)download the same assets repeatedly can help keep things fast.
In many cases, you’ll want to take full advantage of browser caching, and store resources for as long as the browser allows.
But caching everything, forever, can cause some headaches. When setting caching rules for resources, you need to consider what might happen if a resource changes.
For example; imagine that you alter your CSS to change the layout of your website. Some of your users may have a cached, older version of that CSS stored in their browser cache. They’ll see the old (or potentially even a broken) layout, because they’ve loaded a ‘stale’ file. In scenarios like this, you don’t want the cached version to be served; and you might even want to invalidate those cached resources.
Cache control rules can be configured to prevent these kinds of conflict, by setting appropriate expiration timeframes, or, using new/different filenames for resources which have changed. Because the browser cache is tied to the URLs of resource, changing the URL of that resource is a foolproof way of ‘cache-busting’.
Managing browser caching
When configuring browser caching rules, there are three basic questions to answer for every type of resource:
- Should the browser be allowed to cache this?
- How long should it be allowed to be cached for?
- What might invalidate that cache?
For almost all websites, ‘static’ assets like images, or CSS/JavaScript which is unlikely to change frequently, should be cached as ‘aggressively’ as possible, for as long as possible. You can do that by setting a combination of a max-age, and/or a specific expiry date in the far future.
If your website includes versioning parameters on your resources, then you can safely cache them forever – because as soon as changes are made, the system will provide a different URL to load.
For websites which don’t automatically version their files, the caching rules and expiration times should aim to balance the benefits of efficiently loading resources, versus the risk of serving stale content for a period of time. Those decisions will vary by website, by resource type, and by risk.
Changing the URL isn’t the only way to invalidate a cached resource. You can, for example, use more advanced HTTP header configurations (<em>’ETags'</em>) to instruct the browser to check that the contents of the cached file match that of the requested file. But these types of setups are a lot rarer, and a lot more complicated to configure and maintain. In most cases, simply versioning resources is the best way to manage when they’re invalidated.
Checking your browser cache settings
The easiest way to check whether you’re taking full advantage of browser caching is by using Google’s PageSpeed Insights tool.
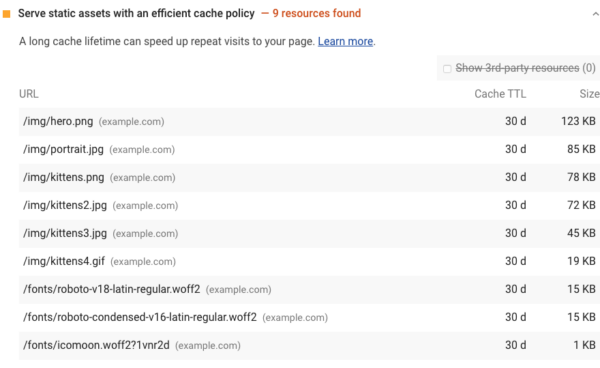
Amongst other recommendations, it’ll identify resources which aren’t being cached, or which have short lifespans (and which you might want to cache for a longer period). In the example below, we can see a series of images and fonts which are only cached for 30 days. If you see similar results, you should consider increasing the expiry date (or maximum age) of the relevant cache settings.

How to implement and configure browser caching
Configuring browser caching by hand can be extremely complex (e.g., you might need modify a .htaccess file extensively).
The good news is that there are a range of excellent WordPress plugins which can help you to set up the basics, and prevent you from needing to get knee-deep into your server configuration. We have some great suggestions in our top WordPress plugin recommendations article.
Most good WordPress hosting companies will also set sensible defaults, which should provide a good starting point to optimize from. You could also pair that with a good CDN (like Cloudflare) to squeeze even more out of your caching setup.
If you do want to get hands-on instead of using a plugin, this article from Kinsta has some great tips and tricks.

Discussion (21)